How to Install a Toilet Flange - Step-by-Step Guide for Correct Setup
How to Install a Toilet Flange - Step-by-Step Guide for Correct Setup
Blog Article
We have uncovered this great article pertaining to Fix a Broken Toilet Flange directly below on the web and reckoned it made perfect sense to relate it with you on this site.

Introduction:
Recognizing the Importance of a Toilet Flange:
In the realm of plumbing, the often-overlooked bathroom flange plays a pivotal function in making certain the seamless procedure of your restroom components. Acting as an important port in between your toilet and the underlying waste pipe, the toilet flange works as the unhonored hero of your plumbing system. Without this strong component, your bathroom would be prone to instability and leakages, potentially causing pricey repair services and hassle. As a result, comprehending the value of a properly installed and preserved bathroom flange is vital for any type of homeowner starting plumbing projects or dealing with fixing needs.
Why Proper Installation and Maintenance Matter:
Proper setup and careful upkeep of the toilet flange are important for securing the stability of your plumbing framework. A diligently mounted flange not just supports your commode securely in place yet likewise creates a bulletproof seal, preventing the dangers of leakages and odours. By welcoming a proactive method to flange maintenance, you can mitigate the risk of turbulent plumbing concerns and maintain the serenity of your household atmosphere. Throughout this insightful overview, we'll decipher the intricacies of commode flange setup and fixing, equipping you with the knowledge and expertise to navigate these vital jobs adeptly.
Finest Practices When Installing a Toilet Flange:
Making sure a seamless toilet flange installment calls for adherence to a set of finest techniques that assure sturdiness and performance. Begin by meticulously examining your tools and materials, ensuring you have the required equipment for the job in advance. Picking the appropriate flange product, whether PVC, ABS, or cast iron, is extremely important, as it identifies the long life and performance of your plumbing component. Furthermore, assessing existing plumbing conditions, such as looking for damages or deterioration, is crucial for preemptively resolving possible difficulties and making certain a smooth installment procedure. By adopting these preparatory procedures, you set a solid foundation for an effective bathroom flange setup, minimising the likelihood of future issues and facilitating lasting maintenance.
Once adequately ready, proceed with the mindful removal of the old flange, following an organized technique to avoid triggering damage to bordering components. Utilize strategies tailored to resolve stubborn or rusted flanges, guaranteeing their swift and secure elimination without compromising the stability of the bordering plumbing facilities. With the old flange got rid of, meticulously mount the brand-new replacement flange, picking one that fits snugly and safely into location. Correctly safeguarding the flange to the floor making use of screws or adhesive is important, as it ensures stability and protects against future leaks. By sticking to these best methods throughout the setup procedure, you lay the groundwork for a robust and trustworthy commode flange setup that stands up to the examination of time.
Mounting a New Toilet Flange:
When setting up a brand-new commode flange, the initial step is to select the appropriate substitute for your plumbing configuration. Consider variables such as the material of the flange, with alternatives consisting of PVC, ABS, or cast iron. PVC flanges are known for their affordability and resistance to deterioration, making them a prominent selection for DIY lovers. ABS flanges use similar advantages to PVC but brag added longevity, making them suitable for high-traffic locations or commercial settings. Cast iron flanges, renowned for their toughness and longevity, are excellent for installations where toughness is paramount. Furthermore, make certain that the substitute flange is correctly sized and fits comfortably right into area to develop a water tight seal and prevent leakages.
Safeguarding the Flange to the Floor:
When you've chosen the ideal replacement flange, it's vital to secure it correctly to the flooring to make certain stability and stop future concerns. Begin by positioning and aligning the flange correctly over the waste pipe, making sure that it rests flush with the floor surface. Relying on the sort of flange and your specific installation choices, you can protect the flange to the floor making use of screws or sticky. If using screws, be sure to utilize corrosion-resistant choices to prevent rusting with time. Conversely, adhesive can supply a secure bond in between the flange and the floor, making certain a durable and trusted installment. By following these actions and taking the essential safety measures, you can mount a new bathroom flange with self-confidence, ensuring a resilient and leak-free plumbing component.
Best Practices When Repairing a Broken Flange:
Repairing a damaged commode flange needs meticulous attention to detail and adherence to finest techniques to ensure a long lasting service. Begin by completely examining the level of the damages and recognizing the underlying reason, whether it be rust, fractures, or imbalance. This examination will certainly direct your repair work method, allowing you to select one of the most suitable techniques and products for recovering the flange to its optimum condition. Furthermore, consider the bordering plumbing facilities and flooring security to resolve any kind of possible contributing elements and prevent future issues from developing. By carrying out an extensive assessment and evaluation, you lay the groundwork for a reliable and enduring repair procedure that solves the source of the trouble.
With a clear understanding of the flange's condition and the aspects influencing its damage, wage the repair service procedure using accuracy and treatment. Depending on the intensity of the damages, you might choose fixing methods such as epoxy putty, repair service flange packages, or partial flange replacements. Guarantee that the selected repair method effectively deals with the particular problems available while preserving the structural integrity and performance of the flange. Furthermore, take aggressive steps to strengthen the repaired flange and prevent future damages, such as using sealer or waterproofing materials to protect against leakages and rust. By adhering to these best techniques throughout the repair work process, you can recover your damaged flange to optimal problem, making certain the long-lasting reliability and efficiency of your plumbing system.
Types of Toilet Flanges:
Recognizing the different sorts of bathroom flanges is important for choosing one of the most suitable alternative for your plumbing needs. PVC, ABS, and cast iron are among the usual materials utilized in commode flange construction, each offering unique benefits and considerations. PVC flanges, understood for their cost and deterioration resistance, are favoured for their ease of setup and resilience. Abdominal flanges, similar to PVC in terms of cost and convenience of installment, are treasured for their robustness and resistance to impacts. On the other hand, cast iron flanges, renowned for their extraordinary stamina and long life, are usually preferred for high-traffic locations or business setups where longevity is extremely important. By acquainting on your own with the qualities of each material, you can make an informed decision when picking a bathroom flange that lines up with your specific needs and choices.
In addition to product factors to consider, bathroom flanges also come in different styles and designs to suit various plumbing configurations and setup preferences. Offset flanges, for instance, are developed to suit bathrooms mounted on floors that are uneven or where the waste pipe lies off-centre. Similarly, repair service flanges, also referred to as repair rings or spacer rings, are utilized to resolve issues such as split or damaged flanges without the requirement for considerable plumbing modifications. Furthermore, flexible flanges supply flexibility in positioning, enabling exact placement and fit throughout installment. By exploring the diverse range of bathroom flange types and styles offered, you can select the choice that finest fits your plumbing setup and installment demands, making sure a smooth and trustworthy option for your shower room fixtures.
Specialty Options:
Along with standard commode flanges, there are specialized choices available to resolve certain plumbing difficulties and installation preferences. One such option is the countered flange, which is created to accommodate toilets mounted on floors that are uneven or where the waste pipe lies off-centre. Offset flanges include a distinct layout that allows the commode to be positioned at a mild angle, compensating for irregular flooring or misaligned plumbing connections. This cutting-edge solution makes sure a safe and secure and secure setup, removing the requirement for expensive and taxing flooring leveling or pipe relocation. By integrating a countered flange into your plumbing setup, you can get rid of usual installment challenges and attain a professional-quality outcome effortlessly.
An additional specialized alternative worth considering is the repair flange, also known as a repair ring or spacer ring. Repair flanges are particularly developed to deal with issues such as cracked or damaged commode flanges without the requirement for comprehensive plumbing modifications. These functional elements can be installed directly over the existing flange, providing a tough and trustworthy base for protecting the commode in position. Repair flanges come in numerous sizes and arrangements to suit different flange sizes and installation needs, making them a convenient and cost-efficient service for settling flange-related problems. Whether you're managing a minor flange repair work or an extra complex plumbing problem, including specialty options like balanced out and fixing flanges can streamline the installation process and make sure durable performance for your restroom fixtures.
Final thought:
To conclude, grasping the art of bathroom flange setup and repair service is necessary for keeping a useful and leak-free plumbing system in your house. By comprehending the value of an effectively set up flange and adhering to best techniques throughout the process, you can ensure the long life and reliability of your shower room components. Whether you're selecting the right sort of flange, carrying out fixings, or discovering specialty alternatives, attention to detail and careful implementation are vital. Normal maintenance and proactive fixing can assist avoid costly plumbing concerns and protect the tranquility of your family environment. Equipped with the understanding and abilities acquired from this comprehensive guide, you can take on bathroom flange installment and fixing with confidence, encouraging you to safeguard your plumbing system for several years ahead.
How to Install a Toilet Flange on A Concrete Floor
Preparation in Installing or Replacing a Toilet Flange
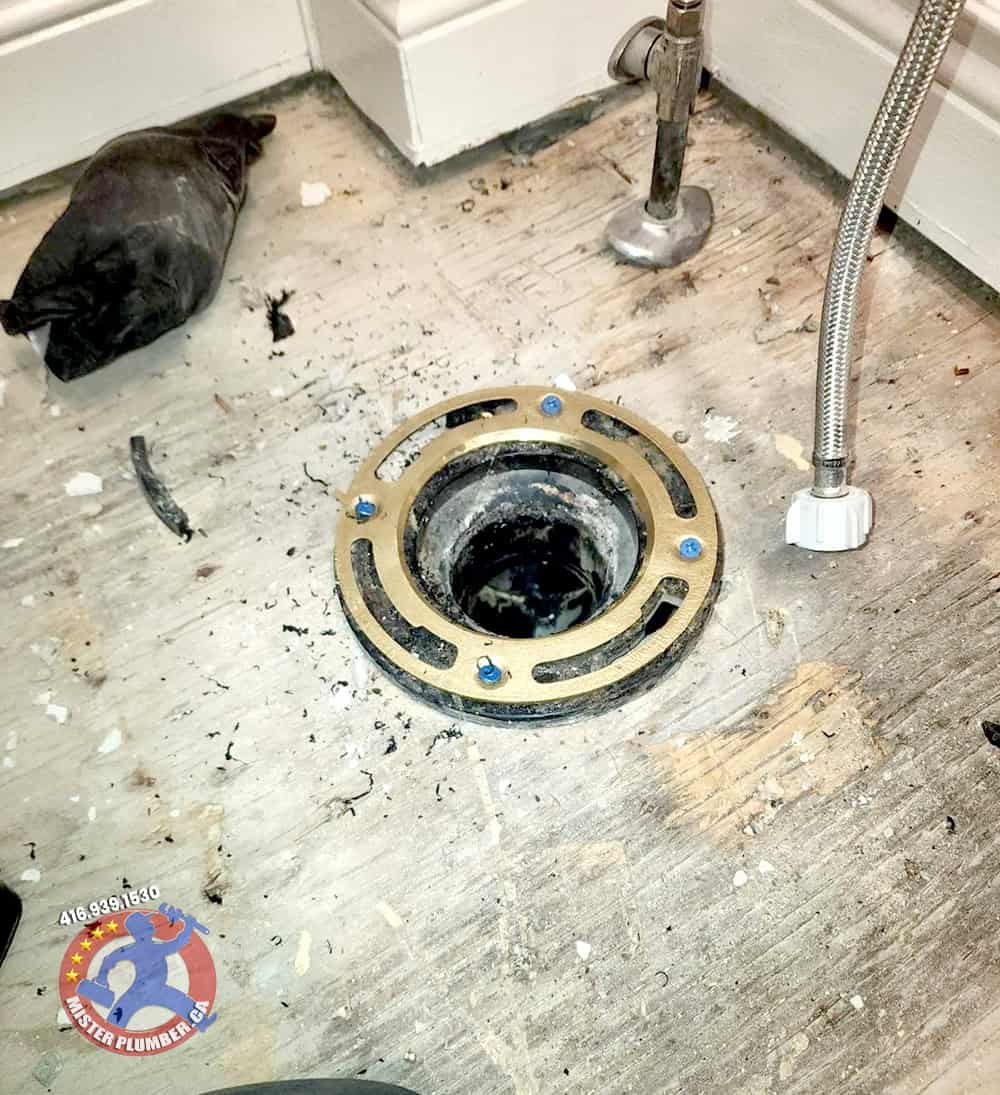
Gloves Screwdriver Hacksaw or a power saw Measuring tape Putty knife Hammer New screws (if needed) New T-bolts (if needed) New wax ring (if needed) Remove the Old Flange
The first step is to remove the old flange. You can unscrew the bolts that hold the flange in place. If the bolts are rusted or stuck, you may need a grinder to get them out.
Once the bolts are out, you should be able to pull the flange out if needed. You can try prying it out with a screwdriver or a putty knife if it’s stuck.
Scrape off the Old Wax Ring
Now that the flange is out, you need to remove the old wax ring. You can do this by scraping it off with a putty knife. Be sure to get all of the wax off so that the new wax ring will adhere properly.
Clean the Area around the Drain
Once the wax ring is removed, you need to clean the area around the drain. This will ensure that the new flange is attached appropriately.
You can use a brush and some soapy water to clean the area. If there is any rust or build-up, you may need to use a power drill with a wire brush attachment to remove it.
Measure the Size of the Flange
Now that the area is clean, you need to measure the size of the flange. This will ensure that you get the correct size flange for your toilet.
Most flanges are either 3 or 4 inches in diameter. To measure the diameter, you will need to use a tape measure.
Select the Correct Size Flange
Once you know the diameter of the flange, you need to select the correct size. If you’re not sure which size to get, you can always ask a salesperson at the hardware store for help.
One way to ensure that you get the right size flange is to take the old one to the store. Just make sure that the old flange is clean and free of any wax or build-up.
Set the Toilet Flange in Place
The next step is to set the new flange in place. You will need to align the flange with the drain to line up the bolt holes. It would help if you also considered the distance from the wall.
Most flanges are designed to be installed about 12 inches from the wall to the center of the flange. However, you may need to adjust this based on the size of your toilet. Our favorite flanges to install are twist in flanges which you can pick up from your local Home Depot. You can check them out here.
Drill Holes for the Screws
Once the flange is in place, you need to drill holes for the screws in the concrete. You will need to use a concrete drill bit that is slightly smaller than the screws.
The number of screws you need will depend on the size of the flange. Most flanges require four screws to hold them in place.
Install the Screws
Once the holes are drilled, you can install the screws. You will need to use a screwdriver to tighten them in place. Be sure not to overtighten the screws as this can damage the flange and may cause the toilet to leak from the base.
Place the New Wax Ring on the Flange
Now that the flange is installed, you need to place the wax ring on top. The ring should fit snugly around the flange.
If you’re not sure which size wax ring to get, you can always ask a salesperson at the hardware store for help.
Set the Toilet Bowl in Place
Now that the wax ring is in place, you can set the toilet bowl in place. You will need to align the bolt holes with the holes on the flange. Once the bowl is in place, you can start to tighten the bolts.
Connect the Water Supply Line
The final step is to connect the water supply line to the toilet. You will need to screw the line into the fitting on the bottom of the tank.
Once the line is tight, you can turn on the water supply and flush the toilet to check for leaks. If there are no leaks, then you’re done! You’ve successfully installed a toilet flange.
If you want to know more about the entire toilet installation process, from removing to installing a new toilet, you can check out our article about How to Remove a Toilet and Replace It With a New One.
Conclusion
Installing a toilet flange is a relatively easy do-it-yourself project. Just be sure to measure the flange and select the correct size. Also, you should remember is that the screws must be hand tight only; overtightening them may cause the flange to break.
However, if you have doubts about your plumbing skills, it’s always best to call a professional plumber to help you install your toilet flange or even your entire toilet. This can save you time, money, and headaches because they know how to do it quickly and efficiently.
If you live in Lower Mainland copyright and need a trustworthy and experienced plumber to install your toilet flange, Your Guy Plumbing is here to assist you 24/7. We offer toilet installation and repair, as well as other plumbing services to meet all of your needs.
I recently found that article about How to Replace a Toilet Flange when perusing the internet. Do you know another person who is truly interested in the topic? Feel free to promote it. We appreciate reading our article about How to Replace a Toilet Flange.
Click Here Report this page